Width and height are defined here as measurements of the entire size of the window treatment, the "covering area" - NOT the dimensions of individual panels! As you may notice the drapery panels are not flat when they are closed. They are still folding like ripples to achieve a fullness look. A flat panel like the one sold by the stores may only cover less than 1/2 to 1/3 of its width when installed. For example, a 84" flat panel may only cover a 33" wide window while an 84" window may require you to buy 2-3 pieces of 84" flat panels. If you want to stretch the panels to their actual width you will end up with the window looking like covering by a bed sheet. Sound confusing about how much panel you would need? We like to make life easier for everyone, and who has the time and energy to figure out how wide a panel need to be so that the finished curtain will look perfect? It should be our job to calculate that, not yours, right? So all we ask you to do is to measure the width and height of the area you want to be covered by the window treatment, and we will figure out the rest.
The following are suggestions for how to correctly measure the window treatment covering area.
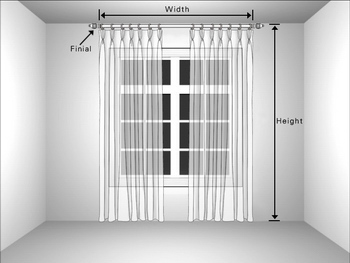
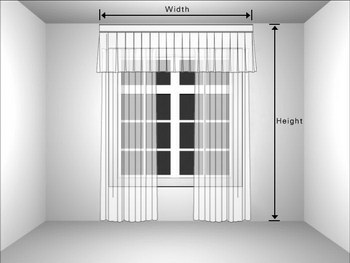
Width (covering area's width or panel's gathered width):
It is very easy to determine your window treatment covering area's width and height. Most importantly, there is no absolute rule for how tall or wide coverings should be; your preference is the guide. For example: many people prefer their window treatments to be larger than the window to create the illusion of a larger opening, while others prefer a closer fit.
To determine your window treatment's width, measure from the outside of one side of the window casing to the outside of the opposite side (note illustration below). Then add 10-16 inches (25-40cm) to that measurement. This figure will be your window treatment's width.
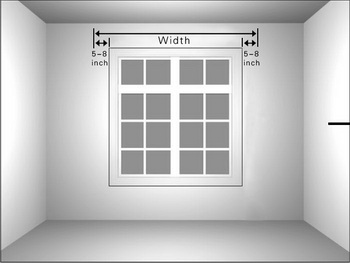
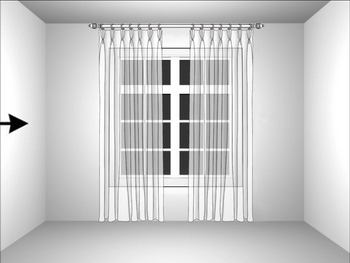
By measuring this way, the final product should extend 5-8 inches (13-20cm) on either side of your window casing. This will stack a portion of the draperies on the outside of the window casing when they are opened, minimizing any view obstruction by the drapery panels. It will also make your widow look larger than it actually is.
If you are a bit daring, you can achieve an even more dramatic visual effect by making the window treatments even wider! Simply add at least 16 inches (40cm) to the entire width measurement of the window (8 inches for each side of the window). For example: if your actual window width is 52 inches (132cm), use 68 (52+16) inches (172cm) or more. This "oversize" treatment will make the window even grander and more opulent to the eye. However, if you do choose this option, please note that both sides of the window moldings may be visible when the drapery panels are opened.
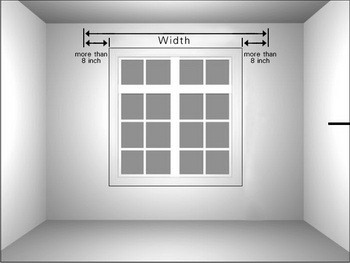
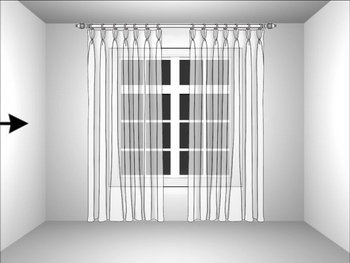
For window treatments that use curtain rods, you needn't worry about the length of the decorative finial on either side of the rod when you are measuring the window treatment's width. However, you do need to be aware that finials will add more width to the final product when it is installed. Make sure you have at least 4-8 inches (10-20cm) of extra room on both sides of the window treatments to accommodate the extra width if you are planning to use finials in a tight space.
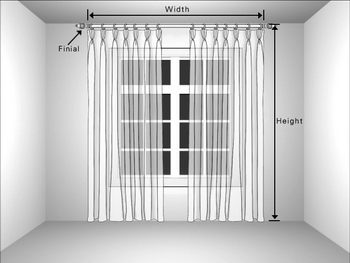
If you have more than one window, we suggest you measure each window independently because the actual size of each window may be a bit different, even if they seem identical.
Height:
The Height represents the tall-wise that you want your window treatment to cover. Note with the exception of Grommet and Rod-pocket styles, the measurement is from the top of the curtain rod all the way down to the bottom of the window treatment (aka "Rod Height" as illustrated above). This measurement will not necessarily be the exact height of the panel itself. Depending on the type of panels you choose, some require rings to be hung on the rods; therefore, the height of the panel will be the height measurement minus the size of the ring (Usually this makes the "Height" about 1 inch taller than the actual panel height. Luckily, you don't have to worry about these details. We will do the correct subtraction according to the design you chose.).
As mentioned before, there is no absolute rule for how tall or wide coverings should be. Your preference is the guide. We suggest three different options for window treatment's height:
1. Ceiling to Floor

Most commonly, draperies are hung from just under the ceiling (or ceiling molding) all the way down to the floor. Measure the distance from the ceiling (or from bottom of the ceiling molding) to the floor. This will be your window treatment's "height".
If you have a vaulted ceiling, it’s still easy to do. You can locate the top of the window treatment by using a nearby standard-height wall-ceiling as your reference. (Note the photo below, as one example.) Even in rooms with multiple, or irregular vaults, there will usually be at least one standard wall to use as a reference for your measurement.

2. 6-10 inches Above
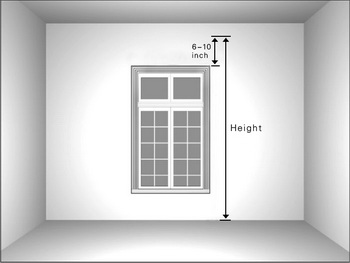
Sometimes, hanging a window treatment all the way from the ceiling is not the best solution. For example, if your ceiling is too high or your window is too low. If this is the case, you may want to place the window treatment 6-10 inches above the window casing instead. Of course, you can set it higher if you want.
3. Puddled Panels

If you like a puddled drapery bottom, add 4-6 inches (10-15cm) to the total of the height measurements.
Traditionally, people let the drapery's bottom hang just above the floor. If you prefer the bottom of the drapery to form a gathering on the floor (note photo above), then you should add 4-6 inches (10-15cm) to your measurement for your final window treatment's height. This will result in a finished product that will gather slightly on the floor when installed. This approach can create a dramatic effect on hardwood floors and fine floor coverings, adding a unique touch of elegance to your home. However, we recommend puddling for decorative panels only. If your panels are going to be opened and closed regularly, puddling is not recommended since the bottoms of the draperies may get dirty very quickly.
